The internals of Python string interning
这篇文章描述了在 CPython 2.7.7 环境下 Python 的 string interning 是如何工作的.
几天之前, 我不得不给一个同事解释内置的intern做了什么事情. 我给了他下面这个例子:
1
2
3
4
5
6
7
8
9
10
>>> s1 = 'foo!'
>>> s2 = 'foo!'
>>> s1 is s2
False
>>> s1 = intern('foo!')
>>> s1
'foo!'
>>> s2 = intern('foo!')
>>> s1 is s2
True
你明白它是干嘛的了… 但是它内部是如何实现的呢?
PyStringObject 结构
让我们深入 CPython 的源码看一下 PyStringObject, 这个代表了 Python 字符串的C语言结构体在stringobject.h文件中:
1
2
3
4
5
6
7
8
9
10
11
12
13
14
15
typedef struct {
    PyObject_VAR_HEAD
    long ob_shash;
    int ob_sstate;
    char ob_sval[1];
    /* Invariants:
     *     ob_sval contains space for 'ob_size+1' elements.
     *     ob_sval[ob_size] == 0.
     *     ob_shash is the hash of the string or -1 if not computed yet.
     *     ob_sstate != 0 iff the string object is in stringobject.c's
     *       'interned' dictionary; in this case the two references
     *       from 'interned' to this object are *not counted* in ob_refcnt.
     */
} PyStringObject;
根据注释, 当且仅当字符串被 intern 的时候ob_sstate变量不是0. 这个变量没有被直接访问过, 总是通过下面几行定义的宏PyString_CHECK_INTERNED来访问:
1
#define PyString_CHECK_INTERNED(op) (((PyStringObject *)(op))->ob_sstate)
interned 字典
然后, 让我们打开stringobject.c, 第24行定义了一个对象的引用, interned 字符串就保存在这儿:
1
static PyObject *interned;
实际上, 这个对象是一个正常的 Python 字典, 它在第4744行被初始化:
1
interned = PyDict_New();
最后, 在PyString_InternInPlace函数的第4730行就是见证魔法的时刻. 执行非常的直接:
1
2
3
4
5
6
7
8
9
10
11
12
13
14
15
16
17
18
19
20
21
22
23
24
25
26
27
28
29
30
31
32
33
34
35
36
PyString_InternInPlace(PyObject **p)
{
    register PyStringObject *s = (PyStringObject *)(*p);
    PyObject *t;
    if (s == NULL || !PyString_Check(s))
        Py_FatalError("PyString_InternInPlace: strings only please!");
    /* If it's a string subclass, we don't really know what putting
       it in the interned dict might do. */
    if (!PyString_CheckExact(s))
        return;
    if (PyString_CHECK_INTERNED(s))
        return;
    if (interned == NULL) {
        interned = PyDict_New();
        if (interned == NULL) {
            PyErr_Clear(); /* Don't leave an exception */
            return;
        }
    }
    t = PyDict_GetItem(interned, (PyObject *)s);
    if (t) {
        Py_INCREF(t);
        Py_DECREF(*p);
        *p = t;
        return;
    }
    if (PyDict_SetItem(interned, (PyObject *)s, (PyObject *)s) < 0) {
        PyErr_Clear();
        return;
    }
    /* The two references in interned are not counted by refcnt.
       The string deallocator will take care of this */
    Py_REFCNT(s) -= 2;
    PyString_CHECK_INTERNED(s) = SSTATE_INTERNED_MORTAL;
}
可以看到, interned 字典里的键都是指向字符串对象的指针, 值也是同样的指针. 此外, 字符串的子类并不会被 intern. 让我们抛开错误检查和引用计数, 用 Python 伪码重写这个函数:
1
2
3
4
5
6
7
8
9
10
11
12
13
14
15
16
17
18
19
20
interned = None
def intern(string):
    if string is None or not type(string) is str:
        raise TypeError
    if string.is_interned:
        return string
    if interned is None:
        global interned
        interned = {}
    t = interned.get(string)
    if t is not None:
        return t
    interned[string] = string
    string.is_interned = True
    return string
很简单, 不是吗?
interning 字符串有什么好处呢?
共享对象
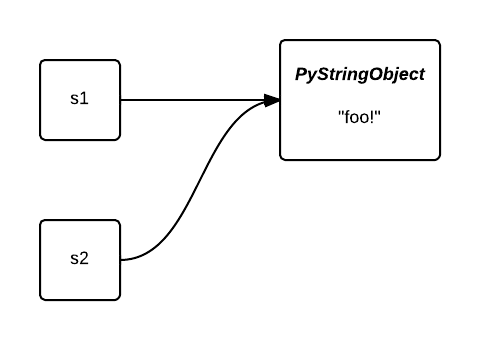
为什么要 intern 字符串? 首先, “共享” 字符串对象减少了内存的使用. 让我们回到第一个例子, 最初, 变量s1和s2指向两个不同的对象:

被 intern 之后, 它们都指向了同一个对象. 第二个对象占用的内存被节省下来了:
当用低熵处理大列表的时候, intern 就很有用了. 例如, 当标记语料库的时候, 我们可以通过 intern 字符串来从自然语言的字频重尾分布中获益. 在下面的例子中, 我们会使用 NLTK 载入莎士比亚的戏剧 哈姆雷特, 并且使用 Heapy 在 intern 之前和之后检查对象堆:
1
2
3
4
5
6
7
8
9
10
11
import guppy
import nltk
hp = guppy.hpy()
hp.setrelheap()
hamlet = nltk.corpus.shakespeare.words('hamlet.xml')
print hp.heap()
hamlet = [intern(wrd) for wrd in nltk.corpus.shakespeare.words('hamlet.xml')]
print hp.heap()
1
2
3
4
5
6
7
8
9
10
11
$ python intern.py
Partition of a set of 31187 objects. Total size = 1725752 bytes.
 Index  Count   %     Size   % Cumulative  % Kind (class / dict of class)
     0  31166 100  1394864  81   1394864  81 str
...
Partition of a set of 4555 objects. Total size = 547840 bytes.
 Index  Count   %     Size   % Cumulative  % Kind (class / dict of class)
     0      4   0   328224  60    328224  60 list
     1   4529  99   215776  39    544000  99 str
可以看到, 我们大幅降低了字符串对象的分配数量, 从31166降到了4529, 并且字符串占用的内存减少了6.5倍!
指针比较
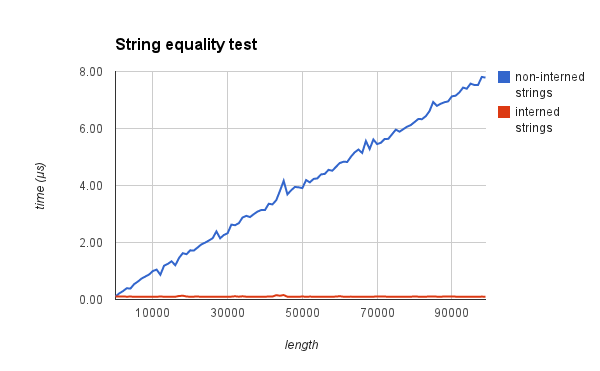
第二, 字符串可以通过 O(1) 的指针比较而不是 O(n) 的每字节比较.
为了证明这个, 我分别测量了在字符串被 intern 和没有被 intern 的情况下验证两个字符串相等时所需要的时间. 下面的结果应该能说服你:
原生 intern
在某些情况下, 字符串是被原生 intern 的. 再次调用第一个例子, 如果我写了 foo 而不是 foo!, 那么字符串 s1 和 s2 就会被”自动地” intern:
1
2
3
4
>>> s1 = 'foo'
>>> s2 = 'foo'
>>> s1 is s2
True
intern 或者不 intern
在写这篇文章之前, 我总是以为, 字符串都是通过一个考虑了它们的长度和组成它们的字符的规则来被原始 intern 的. 事实跟这个差不多但是, 不幸的是, 当遇到使用不同方法创建的字符串对的时候, 我不能推断出这个规则到底是什么. 你可以吗?
1
2
3
4
5
6
7
8
9
10
11
12
13
14
15
16
>>> 'foo' is 'foo'
True
>>> 'foo!' is 'foo!'
False
>>> 'foo' + 'bar' is 'foobar'
True
>>> ''.join(['f']) is ''.join(['f'])
True
>>> ''.join(['f', 'o', 'o']) is ''.join(['f', 'o', 'o'])
False
>>> 'a' * 20 is 'aaaaaaaaaaaaaaaaaaaa'
True
>>> 'a' * 21 is 'aaaaaaaaaaaaaaaaaaaaa'
False
>>> 'foooooooooooooooooooooooooooooo' is 'foooooooooooooooooooooooooooooo'
True
看了这些例子之后, 你不得不承认很难分辨出一个字符串是否会被原始 intern 的基础是什么. 所以让我们阅读更多的 CPython 源码来找出答案!
事实1: 所有长度为0和长度为1的字符串都被 intern
还是在 stringobject.c 中, 这次我们会看一下PyString_FromStringAndSize和PyString_FromString这两个函数里都有的一些有趣的代码:
1
2
3
4
5
6
7
8
9
10
/* share short strings */
if (size == 0) {
    PyObject *t = (PyObject *)op;
    PyString_InternInPlace(&t);
    op = (PyStringObject *)t;
    nullstring = op;
    Py_INCREF(op);
} else if (size == 1 && str != NULL) {
    PyObject *t = (PyObject *)op;
    PyString_InternInPlace(&t);
这样就清楚了: 所有长度为0或者1的字符串都被 intern.
事实2: 字符串在编译的时候被 intern
你编写的 Python 代码并没有直接被解释, 而是经过了一个经典的汇编链, 这个汇编链生成了一种叫做字节码的中间语言. Python 的字节码是由虚拟机执行的指令集: Python 解释器. 指令列表可以在这里查看, 通过dis模块, 你可以找出某个特定的函数或者模块都执行了哪些指令:
1
2
3
4
5
6
7
8
9
10
>>> import dis
>>> def foo():
...     print 'foo!'
...
>>> dis.dis(foo)
  2           0 LOAD_CONST               1 ('foo!')
              3 PRINT_ITEM
              4 PRINT_NEWLINE
              5 LOAD_CONST               0 (None)
              8 RETURN_VALUE
我们知道, 在 Python 中一切都是对象, Code 对象是Python的对象, 它代表了字节码片段. 一个 Code 对象带着所有需要执行的信息: 常量, 变量名, 等等. 当在 CPython 中构建一个 Code 对象的时候, 一些字符串被 intern.
1
2
3
4
5
6
7
8
9
10
11
12
13
14
15
16
17
PyCodeObject *
PyCode_New(int argcount, int nlocals, int stacksize, int flags,
           PyObject *code, PyObject *consts, PyObject *names,
           PyObject *varnames, PyObject *freevars, PyObject *cellvars,
           PyObject *filename, PyObject *name, int firstlineno,
           PyObject *lnotab)
           ...
           /* Intern selected string constants */
           for (i = PyTuple_Size(consts); --i >= 0; ) {
               PyObject *v = PyTuple_GetItem(consts, i);
               if (!PyString_Check(v))
                   continue;
               if (!all_name_chars((unsigned char *)PyString_AS_STRING(v)))
                   continue;
               PyString_InternInPlace(&PyTuple_GET_ITEM(consts, i));
           }
在codeobject.c中, const元组包含了在编译时定义的常量: 你程序中声明的布尔值, 浮点数, 整数, 以及字符串. 字符串保存在这个元组中, 没有被all_name_chars函数过滤掉的字符串就被 intern 了.
在下面的例子中, s1在编译时被声明. 相对地, s2在执行时被生成:
1
2
s1 = 'foo'
s2 = ''.join(['f', 'o', 'o'])
结果就是, s1会被 intern 而s2不会.
all_name_chars函数排除了不是由 ascii 字符, 数字或者下划线组成的字符串, i.e. 看起来像标识符的字符串:
1
2
3
4
5
6
7
8
9
10
11
12
13
14
15
16
17
18
19
20
21
22
#define NAME_CHARS \
    "0123456789ABCDEFGHIJKLMNOPQRSTUVWXYZ_abcdefghijklmnopqrstuvwxyz"

/* all_name_chars(s): true iff all chars in s are valid NAME_CHARS */
static int
all_name_chars(unsigned char *s)
{
    static char ok_name_char[256];
    static unsigned char *name_chars = (unsigned char *)NAME_CHARS;
    if (ok_name_char[*name_chars] == 0) {
        unsigned char *p;
        for (p = name_chars; *p; p++)
            ok_name_char[*p] = 1;
    }
    while (*s) {
        if (ok_name_char[*s++] == 0)
            return 0;
    }
    return 1;
}
知道了这些解释之后, 我们现在就能理解为什么'foo!' is 'foo!'是False而'foo' is 'foo'却是True了. 胜利了? 还没有呢.
字节码优化产生了更多的字符串常量
这听上去非常有悖常理, 但是在下面的例子中, 字符串连接的结果并不是在执行时生成而是在编译的时候:
1
2
>>> 'foo' + 'bar' is 'foobar'
True
这就是为什么'foo' + 'bar'的结果也被 intern 了使得表达式的结果为True.
怎么做到的? 倒数第二个源代码的编译步骤产生了字节码的第一个版本. 这个”线性”的字节码最终到了编译的最后一步, 叫做”窥孔优化(peephole optimization)”.
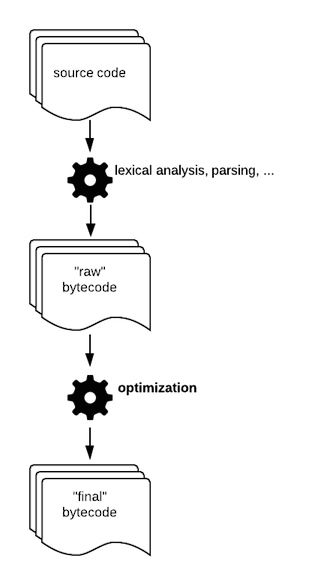
这一步的目标是通过用更快的指令替换一些指令来生成更多的字节码.
常量合并
在窥孔优化过程中使用的一个技术叫做常量合并, 包括预先简化常量表达式. 假设你是一个编译器并且遇到了这样一行:
1
SECONDS = 24 * 60 * 60
你会做什么来简化这个表达式并且节省一些运行时的时钟周期呢? 你会用计算后的值86400来替代这个表达式. 这正好是'foo' + 'bar'表达式发生的事情. 我们定义一个 foobar 函数, 反汇编相应的字节码:
1
2
3
4
5
6
>>> import dis
>>> def foobar():
...         return 'foo' + 'bar'
>>> dis.dis(foobar)
  2           0 LOAD_CONST               3 ('foobar')
              3 RETURN_VALUE
我们知道了为什么下面这个表达式等于 True:
1
>>> 'a' * 20 is 'aaaaaaaaaaaaaaaaaaaa'
避免大的 .pyc 文件
那么为什么'a' * 21 is 'aaaaaaaaaaaaaaaaaaaaa'不等于True呢? 还记得在你所有的包里都能遇到的 .pyc 文件吗? Python的字节码就是保存在这些文件里. 如果有人写了类似['foo!'] * 10**9会发生什么呢? 结果是 .pyc 文件将会非常大. 为了避免这种情况, 通过窥孔优化的序列如果长度大于20的话就会被丢弃.
我知道 intern 了
现在, 你知道所有关于 Python 字符串 intern 的东西啦!
我惊讶于自己为了理解像字符串 intern 一样的轶事而对 CPython 的深入. 我也惊讶于 CPython API 的简洁. 尽管我是一个很弱的 C 开发者, 但是代码可读性非常好, 文档组织也很好, 并且让我觉得自己可以贡献它.
要求不可变性
噢… 最后一件事, 我忘了提起一个非常重要的事情. intern 有效是因为 Python 的字符串是不可变的. intern 可变的对象不会起任何作用并且会导致灾难性的副作用.
但是等等… 我们知道一些其他的不可变对象. 例如整数. 好吧… 猜猜看会发生什么?
1
2
3
4
5
6
7
8
9
10
11
>>> x, y = 256, 256
>>> x is y
True
>>> x, y = int('256'), int('256')
>>> x is y
True
>>> 257 is 257
True
>>> x, y = int('257'), int('257')
>>> x is y
False
:)
更加深入
- Exploring Python Code Objects, Dan Crosta;
- Python string objects implementation, Laurent Luce.